Scene, parts & transforms
The Scene tab is mission control for what's in your scene: the hierarchy of models, groups, and parts, plus exact numeric transforms for the selection.
The hierarchy
Every loaded model becomes a top-level group named after its file, with the model's own authored groups and parts nested below. The header counts the totals — parts, gems, metals.
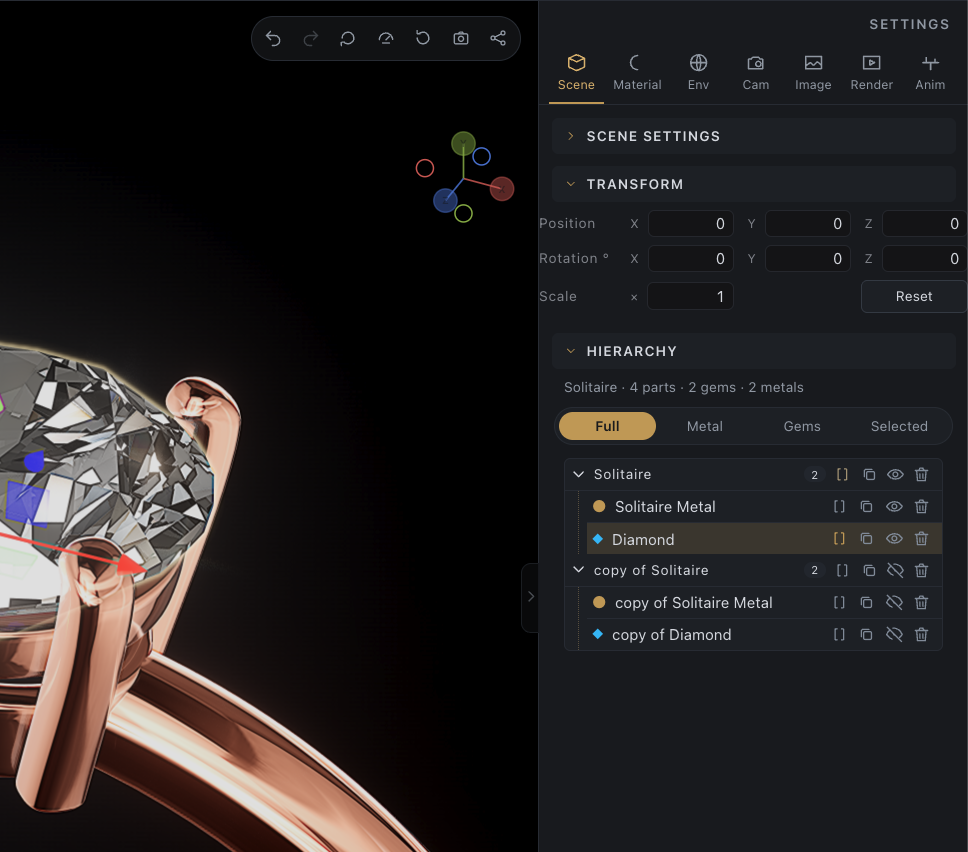
- Click a part row (or the part in the viewport) to select it exclusively.
- Double-click a name to rename it — parts and groups. Enter commits, Esc cancels.
- Click a group row to expand or collapse it.
Each row carries quick actions: select/deselect (multi-selection), duplicate, hide/show, delete. Group rows cascade — hiding a group hides every descendant, selecting a group selects them all.
Multi-selection
The small square button on each row adds or removes that part from the multi-selection without clearing the rest. Group select buttons complete a partial selection to the whole group, or clear it when everything's already in. The gizmo moves the entire selection together, and material edits broadcast to it.
A practical jewelry workflow: duplicate a complete ring, position the copy beside the original, then select both top-level ring groups — one shared gizmo controls the pair while every stone and metal part stays with its own ring.
With two or more parts selected, right-click → Group selection creates a new hierarchy group from them, right where the first member sat.
Drop materials onto rows
Material tiles from the library drag straight onto the hierarchy — rows glow gold while you hover:
- Onto a part row — that mesh takes the material alone, exactly like dropping onto it in the viewport.
- Onto a group row — every part under the group becomes one shared material. Edit any member afterwards — color, roughness, texture scale — and all of them follow. A five-part leather box retextures with one drop and dials as one piece, the grain scaling in step across every part.
Dropping on a single mesh always returns it to an isolated material of its own, detaching it from any share. Parts convert to the material's kind automatically, same as viewport drops.
Variants
Four filter buttons above the tree — Full · Metal · Gems · Selected — restrict what renders without touching any part's own Show/Hide flag. Perfect for inspecting the setting alone or the stones alone.
Isolate
Right-click a part → Isolate hides everything else (if the part is in your multi-selection, the whole selection stays). Exit isolate brings the rest back exactly as it was. Isolation is a filter on top of visibility — nothing's flags are rewritten.
Duplicate and mirror
- Duplicate copies a part (or a whole group subtree) beside the original and selects the copy.
- Duplicate opposite (context menu) mirrors the copy across the piece — made for the second earring, the matching side stone.
Transforms
The gizmo
Pick Move, Rotate, or Scale from the tool rail and drag the gizmo on the selection:
| Modifier | Effect |
|---|---|
| Shift | Snaps — rotation in 90° steps, movement on a fixed grid, scaling in quarter steps |
| Alt | Fine drag — one-tenth speed for jewelry-scale precision |
Uniform scale is the center handle; the three axis handles scale along one axis. Pivot mode repositions the transform origin without moving geometry — set it once, and rotation happens around the point you chose.
Numeric transforms
Select a part and the Scene tab's Transform section shows its position, rotation (degrees), and scale as editable numbers:
- Type an exact value and press Enter.
- Scrub by dragging a field's label left/right.
- Nudge with ↑/↓ (hold Shift for ×10).
- Reset returns the part to its imported placement.
This works on gems too — behind the scenes gem geometry is handled specially for optical accuracy, but to you it's just numbers.
Set mode. Select several parts and the same fields work on the whole set: position shows the selection's center (edit it to slide everything together), while rotation and scale apply about that center — and scale is proportional, so the spacing between parts grows with the parts themselves. Type 1.2 and a matched pair, or a full pavé selection, scales 20% as one piece. Fields re-read after each entry, and Reset returns every part to its own import pose.
Every transform commit is one undo step (⌘Z).
Part kind
GemGpu classifies parts as gem, metal, or surface — the classification decides which material family the part uses. If an import guessed wrong, right-click the part → Set kind and correct it; the part immediately picks up that family's template material.
Scene settings, notes & saving
The top of the Scene tab holds Save to Drive (name the scene settings and store them in your Drive), a Notes field saved with the scene (client, deadline, sizes — whatever helps you), and for signed-in users with an imported model, the explicit Save model to Drive upload.