The interface
One screen, five regions. Everything else opens from here.
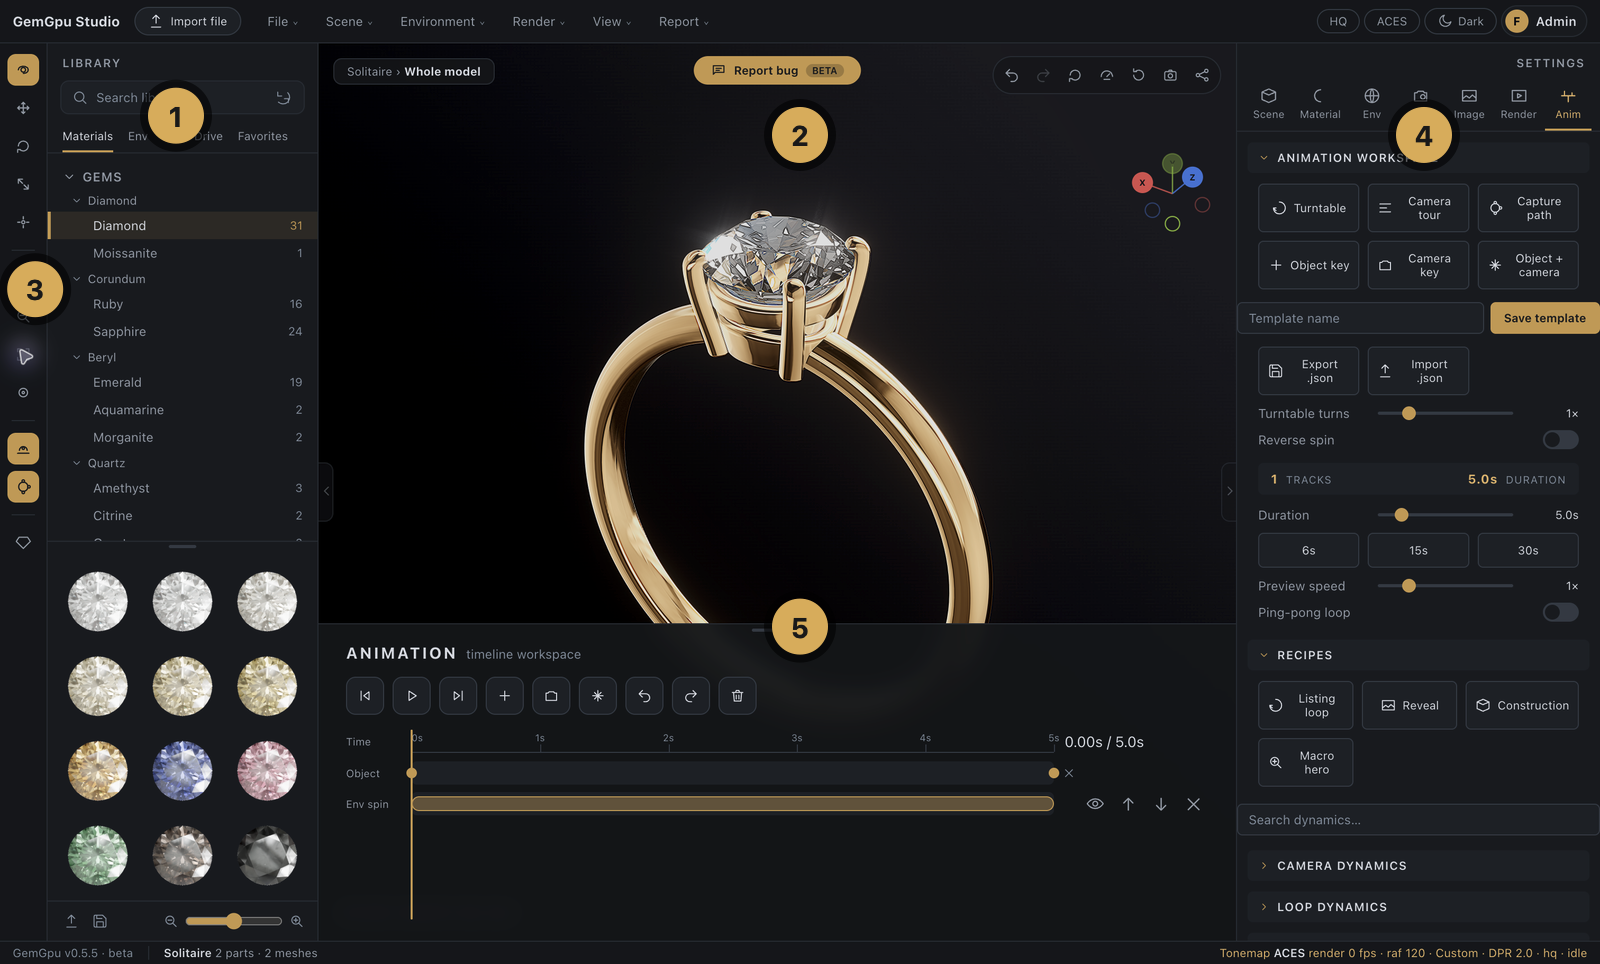
The viewport
The center of the studio is a live, physically-based render — what you see is what exports. Left-drag orbits, wheel zooms, right-drag pans. Click a part to select it; right-click a part for its context menu (duplicate, isolate, hide, materials and more). Drag a model file straight into the viewport to import it.
Above the viewport, the breadcrumb names the loaded model and the selected part. The HUD in the top-right corner keeps the always-useful controls one click away: undo / redo, auto-rotate, performance mode, reset view, snapshot PNG, and copy share link.
The tool rail (left edge)
Five viewport tools, mutually exclusive — the active one glows gold:
| Tool | What it does |
|---|---|
| Orbit | Camera navigation (the default). |
| Move / Rotate / Scale | Transform gizmos for the selected part or multi-selection — see Scene, parts & transforms. |
| Pivot | Reposition the transform pivot without moving geometry. |
Below them: Zoom in / out, Fit to viewport (reframe the whole piece), and Focus selected (frame just the selected part). Then two toggles — Limit camera (keeps the camera from diving below the ground) and Camera controls (the navigation gimbal overlay). At the foot of the rail, Catalog set renders the full 12-image listing pack in one click — see Rendering & export.
The library (left panel)
Your palette of ready-made assets, in five tabs:
- Materials — the full gem, metal, and surface catalog, organized as a category tree (Gems ▸ Corundum ▸ Ruby…) with a thumbnail grid. Click a tile to apply it to the selection (or to everything of that kind when nothing is selected). Drag a tile onto a part to apply it precisely. Star any tile to save it to Favorites.
- Env — HDRI environments, with separate catalogs for Gem light and Metal light (gems and metals are lit by independent environments — a signature GemGpu feature).
- BG — background presets in light / dark / color groups, plus transparent, environment-image, and custom solid/gradient/radial modes.
- Drive — everything you've saved: scenes, materials, render and animation templates, uploaded models. See Drive & library.
- Favorites — your starred materials and HDRIs, exportable as a bundle.
The search field above the tabs filters materials and HDRIs by name; the slider at the bottom resizes thumbnails.
The inspector (right panel)
Seven tabs, one per discipline:
| Tab | Covers |
|---|---|
| Scene | Save/notes, numeric transforms, the parts hierarchy — chapter |
| Material | The selected part's gem, metal, or surface material — gems · metals |
| Env | Environments, studio lights, ground & shadow — chapter |
| Cam | Focal length, saved views, tours — chapter |
| Image | Tone, grade, curves, LUTs, post effects — chapter |
| Render | Output size, stills, video, queue — chapter |
| Anim | Animation workspace and the dynamics families — chapter |
Sections inside each tab collapse — click a header to fold or unfold it.
The timeline dock (bottom)
Opens with the Anim tab (or automatically when you add animation). Transport controls, the playhead, and one lane per track and dynamic. Everything on it drags: clips move and retime, keys slide, edges snap to neighbours. See Animation & dynamics.
The menubar
File · Scene · Environment · Render · View · Report — the menus carry everything that isn't worth a permanent button: opening and exporting scenes, importing HDRIs and render templates, snapshot and video commands, panel toggles, and the bug reporter. Every panel action in these docs is also reachable from a menu.
Top-right corner
HQ toggles high-quality rendering, ACES switches the cinematic tonemap, and the theme button flips dark / light. Your account menu lives here too — sessions, security, and sign-out.